Best Practices: Calibration
In our previous blog post, we discussed the crucial first step in preparing for your facial mocap session: getting your performer ready. Now, we’ll dive into the next step setting up the calibration frame, or neutral file, and explore how to overcome common challenges such as occlusion and lighting to achieve the best possible facial mocap results.
Calibration / Neutral File: The Foundation for Accurate Tracking
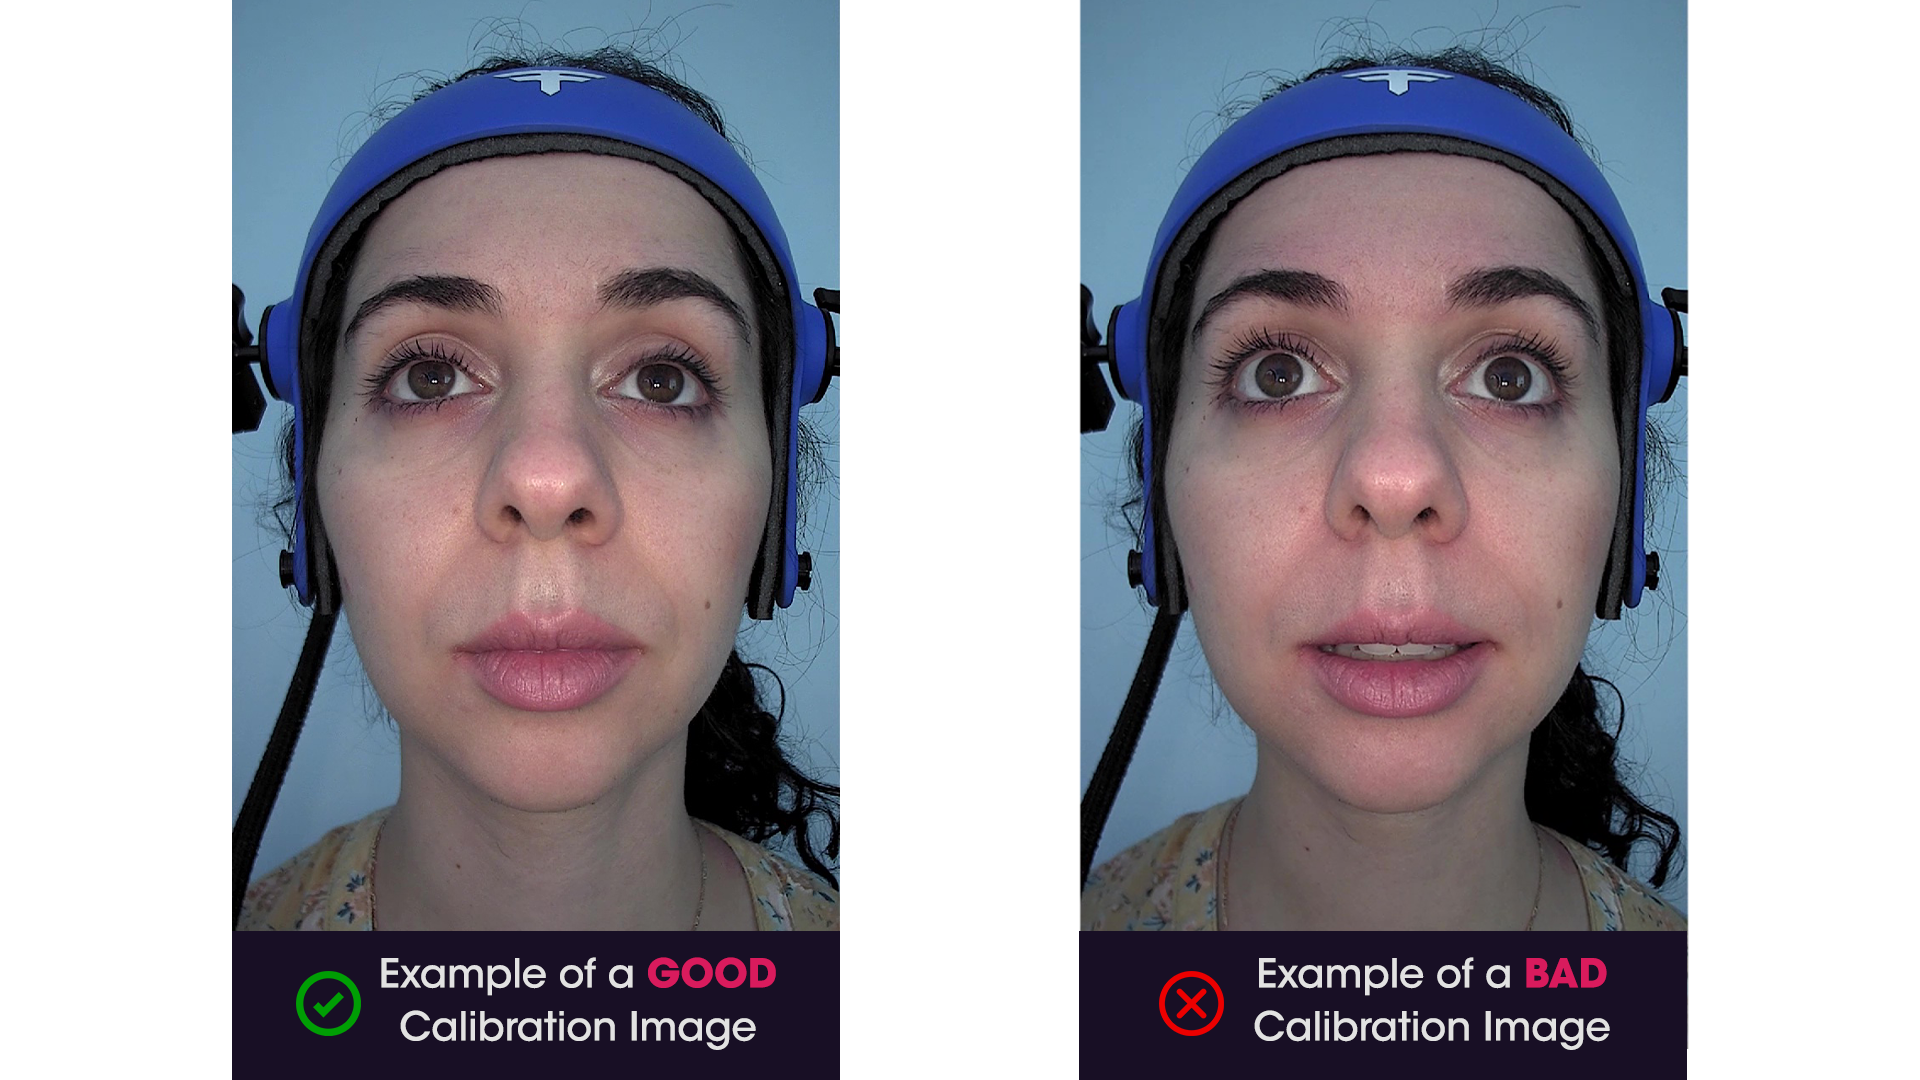
Calibration is perhaps the single most crucial factor for achieving accurate tracking results. A neutral frame is necessary for calibration, particularly during the tracking phase. The quality of the neutral frame captured for each actor will directly affect the tracking and animation data. If you're using Faceware Portal, a good neutral frame is needed for both JSON and FWR Autosolve workflows. When calibrating, it's essential to face the camera or tracking device, relax your face into a neutral position, and look at or slightly below the camera. This process establishes a baseline for all expression values generated during the session. A bad calibration should be immediately apparent, as the facial animation will be inaccurate or appear "glitchy". If that's the case, it's always recommended to recalibrate. Here are things you must consider during the calibration process.
1. Good Neutral Expression: Relaxed and Mouth Closed
For every capture session and each time the performer puts the Head Mounted Camera back on, a neutral expression must be recorded. To capture a good neutral expression, have the performer face forward, relax all facial features, and keep their mouth closed. Ask them to hold this expression for at least 3 seconds, and ensure they don't open their mouth or touch their face during this time. Remember to follow the best capture guidelines, especially regarding framing and lighting.
Calibration can help adjust slightly incorrect animation results. For instance, if your eyelids are naturally more heavily lidded than average, you may need to squint slightly during calibration. This adjustment results in the tracking providing slightly lowered values for blinking, leading to animation where the eyes appear more fully open.

2. Occlusion: Unmasking Your Full Facial Potential
Occlusion refers to something being blocked from view. For facial tracking, this means that the technology is unable to see some portion of your face. To achieve the best results, it's essential that your eyes, nose, mouth, and jaw are clearly visible. While our tracking technology can handle some occlusion, the optimal scenario is a face without facial hair, glasses, or long hair obscuring your features. Make sure to refer to the previous blog post HERE to ensure that your performer is properly prepared for calibration.
3. Lighting: Way to Flawless Facial Tracking
Proper lighting is crucial when working with Faceware's tracking technology. Ideally, your face should be lit with natural, even daylight. However, this isn't always possible, so it's essential to follow best practices for proper lighting:
WHAT TO AVOID
• Auto Exposure: Disable auto exposure if it's too sensitive and causing jitter.
• Tracking in the Dark: Avoid pitch-black rooms, as tracking results may be poor. Minimal light may work, but additional lighting is recommended.
• Monitor Light: Monitor light is generally unsuitable for tracking. Additional lighting will improve results.
• Half Shadows and Directional Lighting: Avoid bright light focused on one side of the face or direct top-down lighting, as these may cause tracking issues.
• Rear Lighting: Position lighting in front of the user and avoid bright light behind them.
• Bright Windows and Lights: Dim or change the direction of bright lights to avoid 'blowouts' and improve tracking quality.
Remember, a face must look like a face for Faceware's technology to track properly. Any lights or shadows that distort your appearance may result in unexpected or questionable tracking.
4. Framing the Perfect Shot (Static Camera)
This section only applies to users who are using a static camera.
Framing the face is essential for achieving smooth, accurate facial tracking and animation. If your face is too far from the camera or tracking device, the animation may be minimized or inaccurate. Ideally, your face should fill the frame from top to bottom, with just enough room for you to open your jaw fully and still be able to see your forehead to your chin/jaw.
Tightly framing the image captures more detailed facial movements and a wider range of motion, resulting in more natural-looking character animation. However, turning your head to the left or right greater than ~30 degrees may cause loss of tracking. Most of your facial features must be within the frame and not occluded for tracking to succeed and for animation to be accurate and natural.
Conclusion
By understanding and addressing calibration, occlusion, and lighting challenges, you'll be well on your way to achieving stellar facial mocap results. Follow these guidelines, and you'll have your characters animating with natural, accurate facial expressions in no time. Happy mocapping! Be sure to read our final article HERE on facial mocap best practices, and what equipment setups we recommend to best capture your next performance.
Request a
Free Trial
Click the button below to download one or all of our software products for a free trial.
Request a TrialPricing
Explore our different licensing and product options to find the best solution for your facial motion capture needs. If you need a more tailored solution, talk to us about our Enterprise Program.
Pricing Options